That's Pretty Clever (Ganz schön clever) Review!
- Posted on
- By Bubba Sadowsky
- 0

How clever is this game? Let's roll some dice and find out!
Hey there everyone! Bubba here!
I really liked the last roll and write that I picked up so I decided to try a new one. I asked my friend, Larry, to help me decide on a new game and I had narrowed it down between Cartographers and Welcome To. I'd heard good things about both and really value his opinion on the subject. (He actually has more games than I do which is IMPRESSIVE). So when I asked which of the two I should pick, without hesitation, he said That's Pretty Clever! Seeing as Larry knows his games I bought it then and there and cracked it open so he could show me how to play! We played right on the game store counter after I closed up for the night.
The Game:
This game has 6 dice and each one gets used on a different section of the score sheet as you see here.
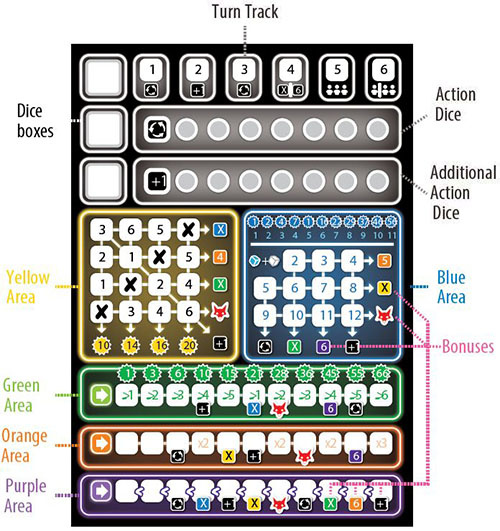
The green dice score in the green section, the purple dice score in the purple section, etc. The only real bit of difference is that the blue die always gets scored in combination with the white die (you add them together) and the white die itself is wild. You start your turn by rolling all 6 dice and then deciding which die you want to use in the moment. You can use any result you want, but any die that you don't pick which has a lower result gets removed from your pool. Your opponents can use those removed dice, so be careful what you pick! You can also use a re-roll any time you want to. Here's a sample roll.

I'd be able to use any of these dice that could still fit on my sheet, so let's say that I really really wanted that orange 3. If I picked that one, I'd lose my green die, my white die, and my yellow die because they all have lower results than a 3. I'd keep the purple die and the blue die because they didn't roll lower than my orange die. The dice that I lose would get set aside on the faces they had rolled. I'd place my orange 3 on an empty dice box and mark a three on the leftmost empty spot of the orange area. Then I'd pick up and roll my remaining purple and blue dice to select a die from that new roll.
Let's try a different pick from that same roll and this time let's say I picked the yellow 1. This time no dice would get set aside because no dice have a lower result than a 1. I'd place the the yellow one on an empty dice box and mark an X in the yellow area on one of the spots marked with a 1. Having marked for that die I'd take my purple, orange, white, blue, and green dice and re-roll them.
Now that we know how dice rolling works, let's take a quick look at how to score them. Yellow dice are marked on a grid trying to make rows, columns, and a long diagonal line. When one of those is filled you instantly get the bonus listed. Orange dice are scored by just writing the die roll in the leftmost space. When you see a "x2" written on a space, you write double the number. Numbers written in this area are worth face value at the end of the game. Purple dice must be greater than the last number written down in that section, but any number may follow a 6. These are also worth face value at the end of the game. Green dice are scored by marking them in the leftmost space that's empty but they must meet the qualification to be scored. These dice must all be "greater than or equal to" an ascending number as you progress left to right. This area is worth an amount of points written above the rightmost scored space. Blue dice, as I said earlier, are always scored with the white die. If we use the sample roll above, we would fill in the 6 on the blue area. It always pairs with whatever white number is currently showing, even if that die has been set aside. This area is worth an amount of points depending on how many dice you scored in it.
When you have picked 3 dice, or have run out of dice to roll, your opponents get to each pick one die that was set aside and score it. Play then passes to the next player. Once every player has been the active player once the round is over and the next round begins. Play 4 rounds if you have 4 players, 5 rounds if you have 3 players, and 6 rounds if you have 2 players or are playing solo!
When the game is over, you take your points for each section and add them together. Any foxes you have managed to get are each worth the same amount of points as your lowest scoring section. For instance, if you have 3 foxes and your lowest scoring section was worth 10 points, your foxes would be worth 10 points each for a total of 30 points.
So how did this game against Larry turn out?
My Playthrough:
So after Larry finished explaining the rules to me my brain was smoking a little as is usual right after having some rules explained to me. As I watched him take his turn I was still trying to figure out how blue dice worked. It took a minute, but it finally clicked.
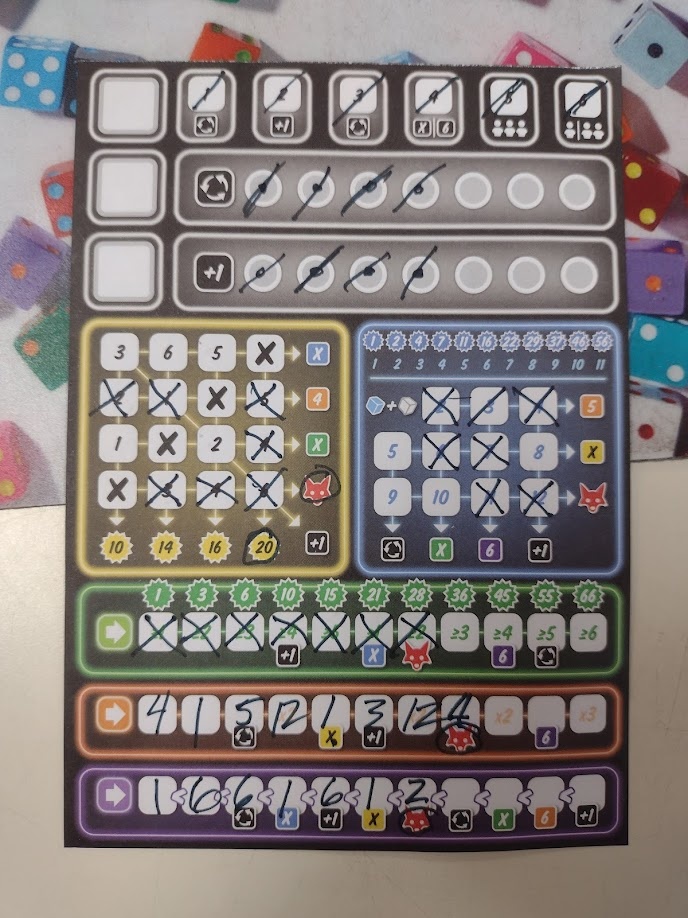
I don't know why, but I was drawn to the yellow section. It seemed like such good value for effort. If you manage to fully fill out the section it's worth 60 points and I figured that's quite a lot! I learned that when you literally can't place dice from a roll, you get to use dice that have either been scored already or have been set aside which can be really useful. I worked on other sections of the board as I could, but yellow... That was my goal and I achieved it! I filled out the whole damn section! Here's my scoresheet.
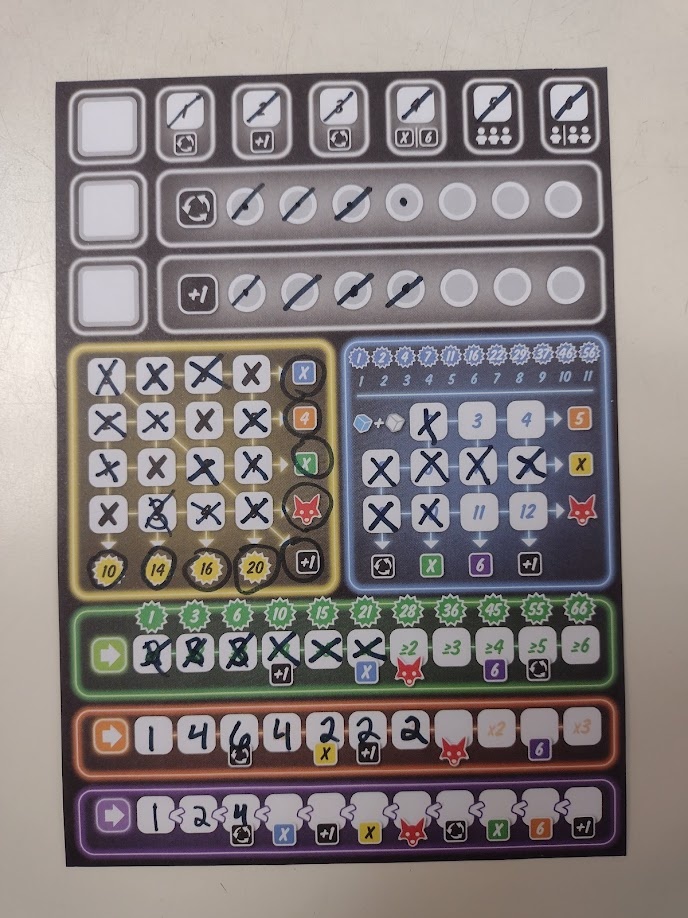
Larry diversified more, but I noticed he tried to focus on the blue while we were playing. It was definitely a "new player vs experienced player" game but I had a great time, as I always do with Larry. Here's his scoresheet.
So how did my strategy of "fill out the entire yellow section" turn out for me? Let's check final scores.
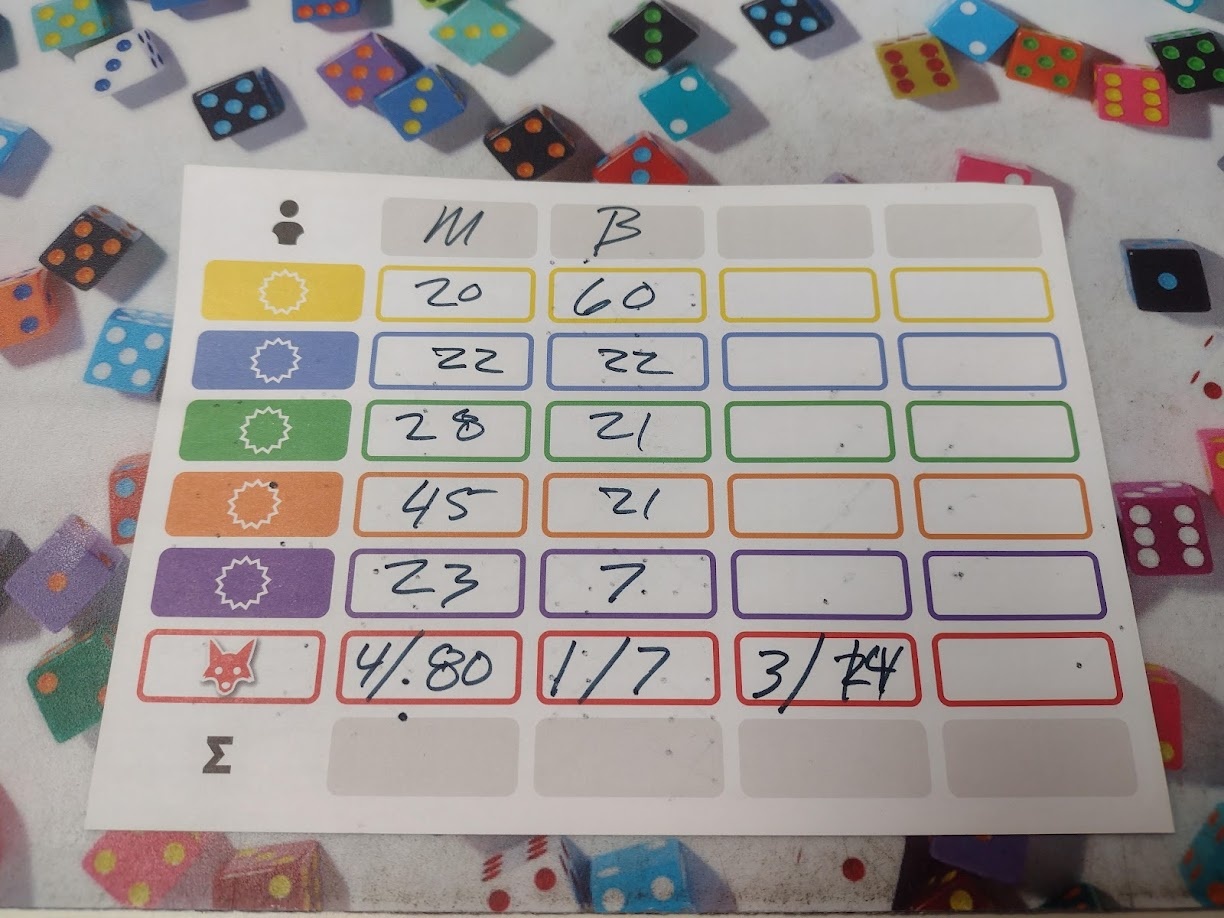
That brings Larry's total to 218 while mine sits at 138... How does this stack up against the solo scoring brackets?
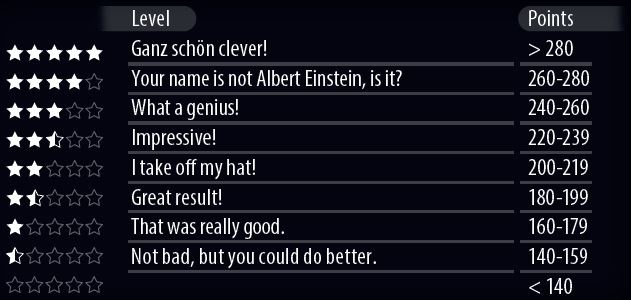
Less than "Not bad, but you could do better." Ouch. Not even half a star. So I guess if I had any advice it would be not to focus on just one section and make sure you diversify. Was I happy that I accomplished my goal? Absolutely. Do I think I would have scored better if I spent some of that energy on my purple section? 100%. I'll definitely do better next time.
My Thoughts:
Pros:
This is a super brain-bendy game in a small box. I love that you start not only each round, but each choice totally at the mercy of the dice and have to plan your strategy from there. It's a super good test of how well you can roll with what you're given and make the best choice available. The dice are wood, which I like, and the pad has a lot of scoresheets so you can play quite a lot. I'd still recommend maybe laminating a couple.
Cons:
I really like this game and it has a LOT going on, but sometimes it can feel like a little much. That said I feel like the issues I have with it, like figuring out how blue dice work, is more of a me problem than the game's problem and I can't really fault it for that (although I guess the rules could have been a little more clear). I could see it being a little busy with symbols and chain reactions. I guess you could put it in a very slightly smaller box, but the one it's in is an industry standard size box. I honestly don't have much to complain about here.
Wrap Up:
I'm definitely a big fan of this one and I really want to play it again. I've heard it's less fun with 3 of 4 players but that's okay because it's usually just me and BJ. My next playthrough I really want to try and get at least half a star. (I'm not salty or anything).
Catch you on the flip, Zip!
-Bubba
Comments
Be the first to comment...